Sunday, August 30, 2015

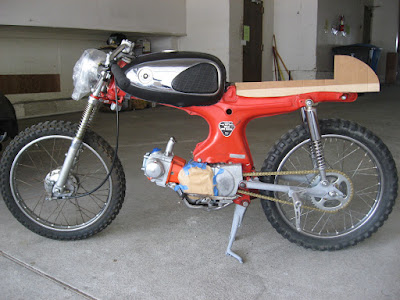
Red: Cafe Seat

Journey of a thousand steps...

It's suddenly bugging me that I don't have the perfect seat on the cafe bike.  Time to get serious about it.  I think first decision is metal forming vs. foam/fiberglass.  As much as I'd prefer to say I hammered out my own cowl, I don't see how I could possibly find enough shop time to do a halfway decent job.  On the other hand, I can take as much time as I need figuring out the foam/fiberglass approach.

But first step is just to start building a visual reference.

Aside from getting the angle and size of the cowl right, the main goal is to preserve the minimalist flow of the rear frame.  It's almost as if you wish you could just throw a pad and seat cover directly onto the frame, add a cowl, and be done with it.


Spares: Battery Cover, Gas Cup

Bought two $45 battery covers from a seller in Indonesia and this is the first one.  Very good shape other than the surface rust.  Put into a dip straight away.  At $45, can I make a decent profit on it if I clean it up and throw primer on it?  Or do I just collect battery covers and chain guards?  I'll need it for the next bike anyway, right?

Also got the new gas cup which looks to be worth the money spent.  Decided against testing it out since I now realize the S90 intake/carb will never fit the engine as long as it's in the CM91.


Tuesday, August 25, 2015

Spare Wheel: 0.3mm Runout

This is what about 0.3mm of runout looks like.  (down from 7mm when I started)


Roxy: Chain Cleaning and Lube

Gave the chain a good cleaning and lube.


Red: Sprocket Cover

Scored a $30 sprocket cover for Red.  Sweet.

While she was out, took a fresh look at her with the white tank, flat brat seat, and no rear fender.


Thursday, August 20, 2015

Ivy: Rear Wheel Swap

Wanted to swap Ivy's rear wheel for the temporary one so I could put new spokes on it and true it.  Swapping the wheel's went without a hitch.  Took the tire, rim strip and tube from Ivy's and put it on the temp one (the one I've been practicing truing).  It actually fits a bit better, I think because the cushions aren't so thick.  May want to swap them out next time.  The new spokes look fantastic on the bike - you don't notice what a big difference they make until you compare them to the old ones.

Surprisingly, all the spokes came out without a problem, no cutting required.  Even many of the holes were already big enough to take the new spokes, though I still had to Dremel a few of them.  Only when I had it back upstairs and was lacing it did I realize I had drilled the wrong holes and had to redo it.

Almost pulled the bearings but then decided I had nothing to gain by pulling them now.  I'll just wait until I have new Nachi's to install.

Also found that there was a bad spoke in the new set (second set from the same eBay seller).  Not only did I get 19 inners and only 17 outers, the extra inner had its threads on the wrong end!  Makes me worry about ordering more sets from this guy, but then again, the first set was fine (except for the inconsistently sized nipples).  I had to use an old spoke from Viola's original to finish the lacing while I wait for the seller to send a replacement.  (the spokes I just took off from that wheel were actually a lot longer than 175mm)

Once I got to truing I got a bit worried.  From the start, this rim had a huge runout of about 7mm.  I thought it would be impossible to get that straight just from adjusting spokes.  The hop was pretty big at about 3-4mm.

With such large movement, the problem became that the dial gauge didn't have a smooth "track" to run on.  When checking hop, the side to side movement was so bad that it would move off the gauge.  And when checking runout, the hop made it so that the gauge was moving all the way out to the edge of the rim.

But I just stuck with it, and didn't actually do anything special, just followed the procedure.  I actually took care of some of the big runout first, enough to be able to then get the gauge on track for the hop.  Even though you're supposed to start with hop first, maybe you just need to start with whichever is worse.

Took some time, but amazingly, I was able to get the runout down to 0.5mm and the hop to an acceptable 1mm (same as the other wheel).  Pleasantly surprised and somewhat impressed with myself!


Monday, August 17, 2015

Spare Wheel: Truing Stand, Part 4

Putting even more time into truing practice, I've got the spare wheel down to a 0.4mm runout and a 1mm hop.

Did one more trip to Ace to get some magnets to make a tool holder and some magnetic pushpins to use for marking the rim at specific points.  Used some spare metal strips to make metal runners for the magnetic base to attach to.

Also got a 5mm Motion Pro Ergo spoke wrench, which was a great piece of kit, but which then revealed that the aftermarket nipples I'm using aren't consistently 5mm!  Some are slightly bigger meaning I have to switch back to the other wrench.

But all in all, absolutely loving the entire "workstation".

Features:

  • Solid base to hold the swing arm including cork lined uprights with C-clamps (Nicko's idea!)
  • Metal runners for attaching the dial gauge's magnetic base.
  • Double tool holder magnets for the 2 spoke wrenches.
  • Paper clip pointers showing both hop and runout simultaneously.
  • Can be disassembled for long-term storage.
  • Perhaps most importantly, it makes use of the previously wasted "wide" swing arm!


Sunday, August 16, 2015

Spare Wheel: Truing Stand, Part 3

After practicing truing for a couple days just using the pointer method, I decided I wanted to step up to a dial gauge.  Found a nice metric one ($10) and also bought a magnetic stand ($20).

I went from a 2mm runout/hop down to 1mm using the gauge.


Friday, August 14, 2015

Spare Wheel: DIY Truing Stand, Part 2

One $50 trip to Ace and I got everything to make the stand.  Spent quite awhile at the store, though, thinking through different approaches to make the base.  Lucked out in finding some hinges that would hold the 3/8 x 10" thru-bolt perfectly and could then be bolted down to the base.

Ace selling the plywood board was key, too.  Also finally put the new $20 cordless drill to good use.

Honestly can't believe it worked out so well...


Thursday, August 13, 2015

Spare Wheel: DIY Truing Stand, Part 1

First step to building the truing stand is to see if I can get the wheel nice and tight on the axle using the spacers I have.  By adding in a few 12mm washers, I got the rear wheel locked in perfectly.

Ended up using the stock "H" spacer on the right.  On the left used the axle sleeve + 3 washers + stock block washer.

Did a little truing just by holding the swingarm up with one hand.  Next step, build a platform to hold the swingarm up!


Wednesday, August 12, 2015

Red: Plastic Battery Cover

Unboxed the new plastic battery cover today.  Wasn't thin plastic like I was expecting, but a chunky piece of thick material.  Made by a guy in New England who sells them on his site for $45 (got mine on eBay for just $26).