Came down to start Ivy and found the kicker would barely move. Almost like the bike was in gear (though it wasn't).
Finally realized the clutch cable was WAY out of adjustment. But was confused, since I'd definitely started and run the engine after the oil change.
Can only think that I changed the cable adjust AFTER starting the engine without realizing I was mis-adjusting it.
Lesson learned: take clutch cable measurements before the oil change and double check it is reset afterwards.
Showing posts with label lessons learned. Show all posts
Showing posts with label lessons learned. Show all posts
Friday, January 12, 2018
Friday, March 17, 2017
Ivy Shakedown #6: Another Lesson Learned
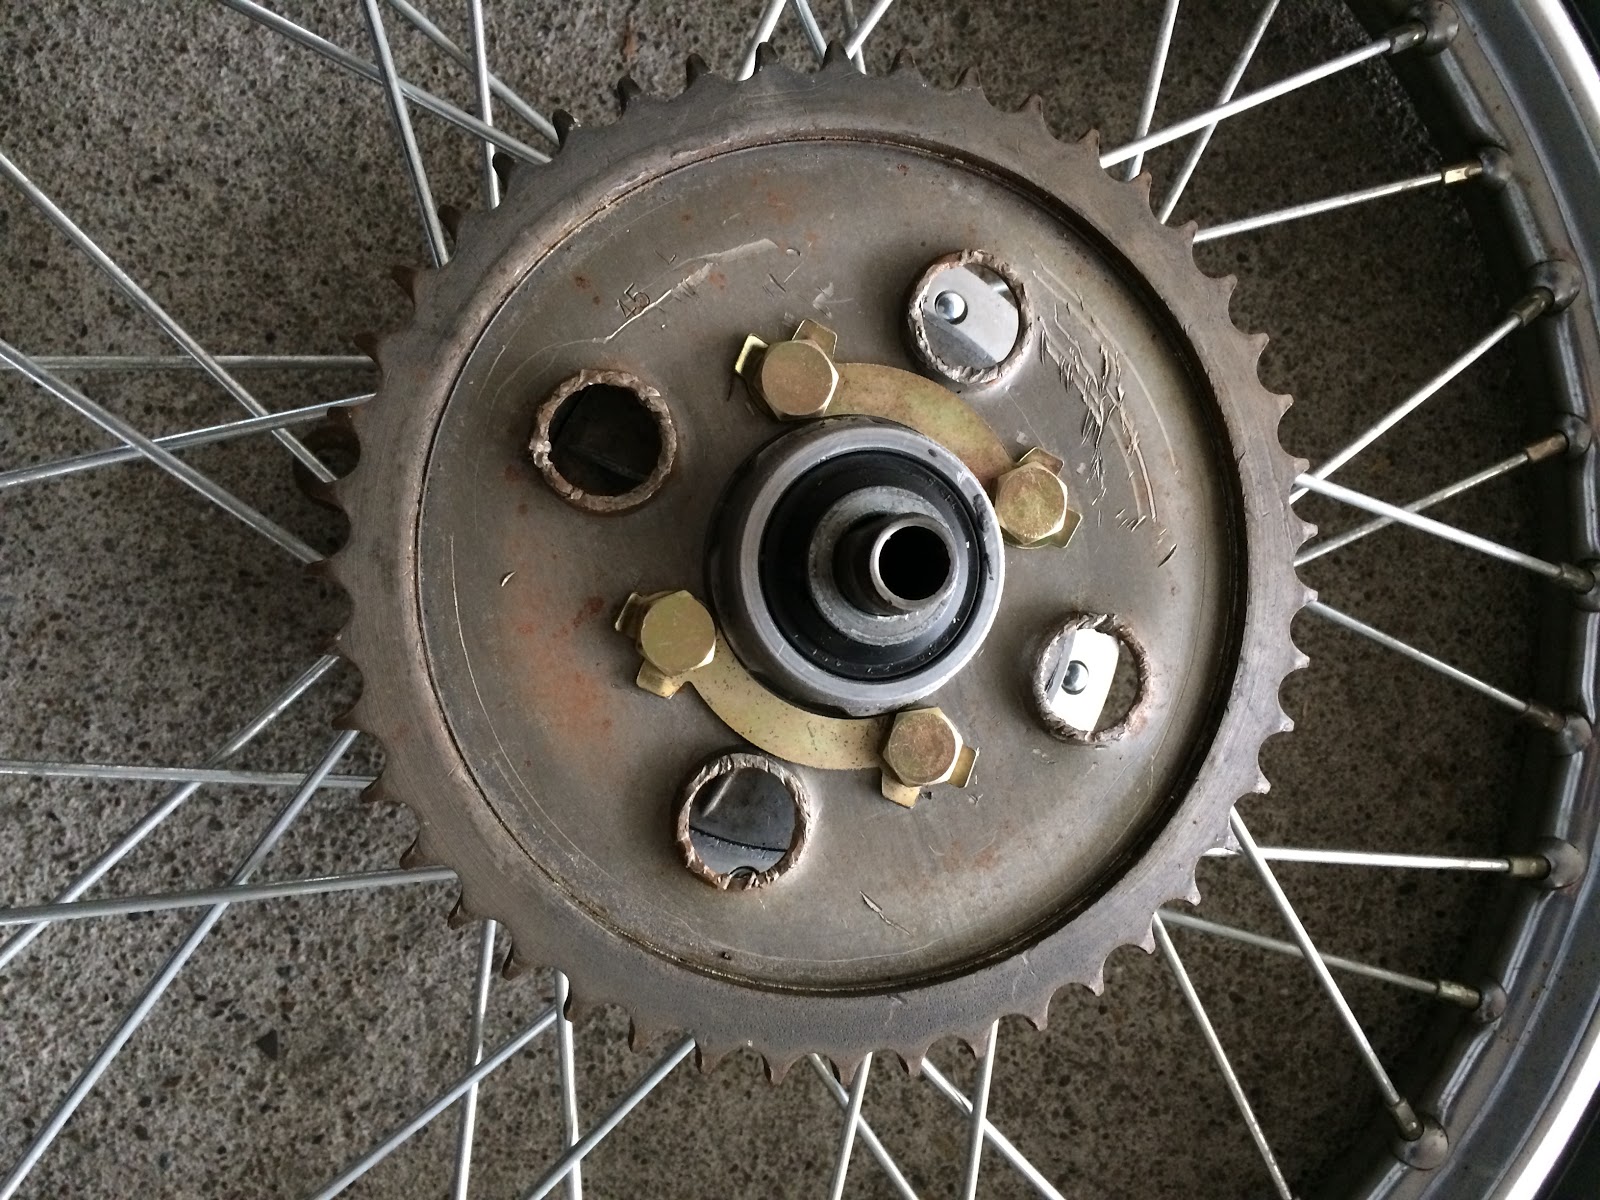
As I was rolling the bike to door, I hear a scraping sound every time the wheel made a full rotation. Upon closer inspection, realized the flange bolts were totally loose and hitting the back of the chain cover bolt! They'd been heavily scored!
Another lesson learned. Not only did I never lock down the keepers, the bolts were not even tightened down!
Tightened them up (but didn't torque).
On the plus side, had a perfect clean ride for Shakedown #6.

Another lesson learned. Not only did I never lock down the keepers, the bolts were not even tightened down!
Tightened them up (but didn't torque).
On the plus side, had a perfect clean ride for Shakedown #6.

Thursday, March 16, 2017
Run Ivy Run: New Clutch & Shakedown #5
As expected, there was significant wear damage to the inside of the clutch cover. The band of metal that holds the arm in place was very worn down. Any further and it would have hit the arm itself. Lesson Learned!
Went on to install the new (correct) pin-type clutch. There was zero tension on the cable, which made it a breeze to install, but had a worrying moment when I thought there was too much slack to even engage the clutch at all.
Then realized that I could also use the extender in the middle of the cable (which had been hidden behind the tank). With that adjusted, the take up and engagement was perfect.
Added 500mL at first.
Shakedown Rd #5
Good, clean laps. Got her up to 3rd. Shifting was smooth and deliberate.
Came back to the box, found the oil level wasn't even registering, so added another 100mL.

Tuesday, January 31, 2017
Run Ivy Run: So, so wrong...
Since last session I'd been researching thread repair options (mostly Time Sert vs Heli-Coil), getting opinions from the Yahoo group, and generally getting mentally geared up to attempt the operation on the cylinder head.
One thing I learned was the "double-nut" technique for installing/removing stud bolts. I used it to remove the stud from the model engine (came out easily). I figured I'd just test it in the cylinder just for kicks.
But when I actually did the double-nut to install it, I was shocked to find it threaded just fine! So perhaps there was something wrong with the bolt itself this whole time, and not the threaded cylinder hole.
While I did order a pair of new studs, I didn't replace the one on the other side (yet). Figured I'd leave well enough alone for now.
After charging the battery, I was getting zero-zip-zilch from the kick start. It really sounded dead. I checked spark and was fat and blue. Then I popped the drain screw on the carb and discovered it was bone dry.
Ok, so that means the problem is that the fuel line inside the carb is clogged, right? RIGHT?
So I pull the carb: detach the throttle cable, pull the fuel line, detach the air filter and the duct tape holding it together.
After doing all of that, I notice that the fuel line between the filter and the carb is also dry. Well that's odd... I open up the aux petcock - and nothing flows. Is it clogged?? NO!!!!
The fuel line was looped up and over the handlebars - the entire issue was a simple case of GRAVITY!!
Frustrating mistake. Reconnected everything, straightened out the line to let the fuel flow. And she starts right up.
Trying to redeem the session, I tried installing the brake light switch, but to do it properly you really need to remove the exhaust, and I was too drained (no pun) to do that, so it's for another day.


Saturday, January 21, 2017
Run Ivy Run: The Sound of Catastrophic failure
Session actually started off very well. I installed the stock air filter along with the S90B carb. Everything went together very nicely. This is the newish airbox, plus one good cover from the Viola original, plus a new repro air filter for 4-into-1. Also confirmed the needle is in the middle position.
Before starting the next job of replacing the rear sprocket, I figured I'd torque the head bolts - a little job that just needed doing.
I use a 14mm socket on the torque wrench since they are 8mm bolts and start cranking away. I'm then surprised to find that the socket starts slipping on the bolts when they get tight. This strikes me as odd, but I don't actually PAUSE to ASSESS the SITUATION.
If I had, I would have seen that the bolts are in fact 13mm and not 14 like they usually are. I was stripping them.
As I was tightening down the top left side bolt, there was a sudden CRACK and the wrench came off suddenly. Apparently, I'd torqued the bolt enough that it ripped the bottom end rod in half. Well, that's just great...
Though, if that rod was going to fail on torque, then it was always going to fail. There's no way I could have under-torqued the bolts, somehow expecting the rod was weak.
Though I'm still not sure if the slipping socket had anything to do with it. Did the slippage cause the wrench not to read the torque correctly which meant I was over-tightening? I don't think so... but...
So definitely a major issue. I think it's going to be a nightmare trying to remove the broken rod and replace it. But I figure the engine should run with only 3 of 4 connecting rods??? Well, at least it that can't affect start up, can it?
After the shock of that wore off, I did the rear sprocket. Pleased to find that in general, all the steps came back easily. The job actually took a lot less time than I'd thought it would.


Subscribe to:
Posts (Atom)