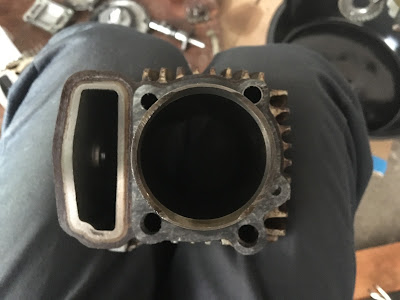
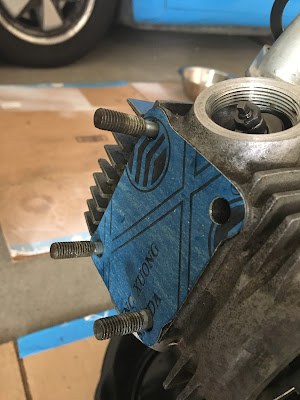
Probably let this go for way too long... but happy to report that Ivy's oil leaks seem finally fixed. And even if she does start to drip again a bit, at least it's not the rivers of oil that were there before.
Glad I took the whole top end apart because it turned out there were a few surprises. Guess I felt like her top end was still "fresh" when in reality it's been more than three years since she got put together.
My main goals had been to change the gasket going from jug to head, as well as to swap out the broken cylinder stud.
But as soon as I got down to the stud, I realized the problem: there was only a tiny bit of thread showing past the crankcase and what little was showing was badly corroded and would never hold a nut anyway. So that was pretty much a non-starter.
But once I had the jug off I found the first of a few missing gaskets. I realized that there was nothing between the jug and the crankcase. Wonder why I never added that in the first place? Very odd, considering how paranoid I must have been about gaskets...
Added that one in then swapped out the copper ring at base of the cylinder. Dabbed a bit of grease on one side to hold it in place.
Then the head gasket looked a bit tired so replaced that and had to do a fair bit of scraping to get it off.
With everything back together, I found the valve clearance on the exhaust had changed so had to dial it out a bit to get to .002.
Also replaced the alternator cover gasket which seemed to have bunched up causing a slow drip.
Started her up and bingo! No more leaks. At least not the steady drip that had been the norm for all these years. Really should have done this sooner!
She sounded a bit odd, though, and I could feel puffs of air from around the exhaust port. Checked and realized there was no gasket there! Again, not sure why I would not have added one in the first place. Added in one of the asbestos gaskets.
Started up again and let her idle for quite awhile to check for leaks. Nothing dripping, but once she was warmed up, I noticed a lot of smoke coming from the exhaust port. Realized it was burning oil coming from a leak at the rocker cover.
So swapped also changed that gasket and ran her again and seemed fine. But will need to keep an eye on it.
She seems no worse for wear with the one stud missing, so hopefully job done!
Saturday, June 29, 2019
Thursday, June 27, 2019
Red: Handlebar Shortening
New Ridgid pipe cutter almost made the job too easy. Took about 5 minutes to shorten the second set of bars by 1.5 inches on each side.
Late night session (about 8:45pm) to swap the bars over. No surprises (almost thought I'd cut it too short to fit everything back on).
Grips are about shoulder width now and feel great! But will need a ride to confirm...
Late night session (about 8:45pm) to swap the bars over. No surprises (almost thought I'd cut it too short to fit everything back on).
Grips are about shoulder width now and feel great! But will need a ride to confirm...
Labels:
handlebars
Saturday, June 22, 2019
Red: Front Brake Cable
Swapped the old brake cable (with no built-in spring!) with the new one. Tight fit but thinking that's actually better. Adjusted and got perfect front brake feel.
Labels:
brakes
Monday, June 3, 2019
Garage Notes: All about Early Forks
Because for whatever reason, I always forget how this works...
The Early forks are nice and simple.
You unscrew the fork seal housing unit (the one with the holes for the pin wrench). Once that's unscrewed, you essentially can break the fork into its three main pieces.
The Early fork seal housing unit does have a replaceable seal, technically speaking. But it is extremely hard to remove (and probably just as hard to install) so you're probably better off just trying to find a good complete unit instead of swapping seals.
You can easily swap out the o-ring inside the unit, though, which may help with some leaks.
Also, don't forget to always install the metal ring on top of the seal before installing (this is where the springs sit).
Also, don't forget that the springs are mounted with the narrower coils toward the top.
Saturday, June 1, 2019
Red: Fork Seal Swap
One big job and lots of little ones...
The main event was swapping the left fork seal housing in the hopes it would fix the leak. Got a couple of fork bottoms on eBay that were very perished and really almost the only usable thing was one good housing.
So the fender and wheel came off. Then unscrewed the fork bottom from the housing. Then unbolted the fork leg itself.
Examining the left leaky housing, it was obvious how worn down it was. The new eBay one did look much better.
Swapped it over, flipped the spring right way up (the narrow coils go on top!) and put the fork back finger tight.
But I had also seen some weeping on the right side and sure enough, that housing was pretty perished as well. Not having a second good housing to use, all I could do was clean it up as much as possible and replace the o-ring. Hopefully that's enough. At least it never leaked as badly as the left.
Added a touch over 100 mL of oil back to each side.
With the wheel off, also took a look at why the front brake seemed so weak (especially compared to Ivy's). Didn't really see anything wrong with the brake itself, so I'm worried that maybe the drum lining is worn down, which unfortunately means a new wheel hub. Though that kills two birds with one stone so that I could balance and true it at the same time. A job for another day...
Also got excited fitting the speedo cable until I realized that there was no speedo gear! Added the cable for now, but will need to wait for the part.
Then went to torque the rear flange bolts only to find that 3 out of the 4 would spin endlessly. All I could really do was try to hold them in place with the tabs. Will need to check them often.
Found a tiny leak from the bottom of the base plate, but it's a very slow leak.
Finally, added the new thermometer to the bars (the one that I got from an Instagram add and then took 2 weeks to arrive...)
Labels:
Fork Seal Saga,
forks,
oil leak,
Run Red Run
Subscribe to:
Comments (Atom)


