Unboxed the new Dime City (EMGO branded) "shorty" set of levers. Pretty cool. Think they'll fit Red's theme nicely.
Friday, April 27, 2018
Thursday, April 26, 2018
Unboxing: Left and Right Controls
Unboxing set of left and right controls. Stripped of switches and wiring, which suits me fine. But the clutch lever was not actually the right size and the brake lever was snapped at the end. But overall, still good bang for the buck.
Labels:
controls
Wednesday, April 25, 2018
Ivy: Better Connections
That loose wire was really bothering me, especially since after I took two minutes to actually think about it clearly, it was obvious that it was the wire from the switch to the 4-way splitter.
Went back down to the garage and checked and sure enough, that very wire popped free as I was messing with it. It was a single wire going into two but the single side wire was too small to really be held by the larger gauge joint.
So I added a second "dummy" wire just for the added filler and redid the connection. Worked a treat.
Also realized that I had added in two connectors for the ground, but had just never bothered to switch from the alligator clips to the bullets. So did that and got rid of the two small alligator clips to ground. Now there's just the one big one left. Sanded down the metal again and this time applied some dielectric. So it's still not the 100% mechanical connection I want, but I feel a lot better with just the single giant clip instead of having all three.
Also tested using the Dremel to cut the outer housing of the Venhill throttle cable. Worked pretty well.
Labels:
electrical
Tuesday, April 24, 2018
Ivy: Connections
Realized there's no good reason to constantly be plugging the sealed batteries into the loom directly every single time. Sourced some 2-pin connectors from Amazon. Hooked females up to the two batteries and the male into the loom.
As I installed everything, I did notice that moving the wires around would sometimes cause a loose wire that would knock out everything except the power to the switch itself.
Also solved the annoying way I've been connecting the batteries to the Battery Tender all this time.
Did a test of the Bondo I got to patch up the tank. Works pretty much as advertised.
Labels:
bondo,
electrical
Saturday, April 21, 2018
Run Red Run: Big Dent
My memories of the "good" white tank sitting in a box in the closet were a little rosier than the reality. I knew it would need a repaint, but I'd completely forgotten about the big dent on the left side. Probably ignored it because I'd always thought it would be covered by the chrome panel anyway. But at the moment, I'm definitely leaning toward leaving the panels off.
Also forgot that this tank has the dual outlets. Luckily it came with the dual inlet type petcock, but if I need a replacement, I'll have to consider that.
Also added a new oil filter to the bottom end.
Also noted that Red needs the "side bolt" type of rear fender. The spare in the closet has been modified for that.
Labels:
oil filter
Friday, April 20, 2018
Run Red Run: Ford Red vs Plain Red
Warm day so wanted to do the comparison test between the new Ford Red Dupli-color engine paint and the original plain Red that I had used already.
Between coats, also pumped up Roxy's deflated tires, unboxed a set of eBay fork springs, and added about 200mL of oil to Ivy.
I'll need to check it again in the light of day but I'm already thinking the Ford Red has a little more "pop" to it.
Between coats, also pumped up Roxy's deflated tires, unboxed a set of eBay fork springs, and added about 200mL of oil to Ivy.
I'll need to check it again in the light of day but I'm already thinking the Ford Red has a little more "pop" to it.
Labels:
painting,
Run Red Run
Monday, April 16, 2018
Bottom End Build: Friction
Added in the new friction disks that came from Asia. That completes the clutch. Didn't bother adding the small springs yet, though.
Labels:
bottom end build,
clutch
Run Red Run: Day 3, The Happy Accident
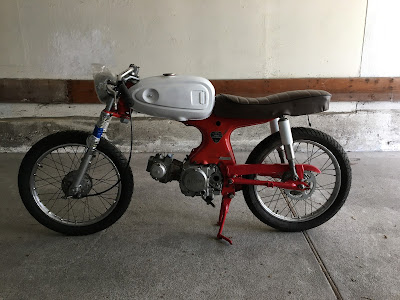
So in making the tail thicker than the front, it ended up creating a fantastically organic shape that really blended in beautifully with the shape of the frame and tank. Really couldn't have been any luckier given that it was totally unintentional.
The chocolate brown already looked good, so I was eager to get the black/white back on.
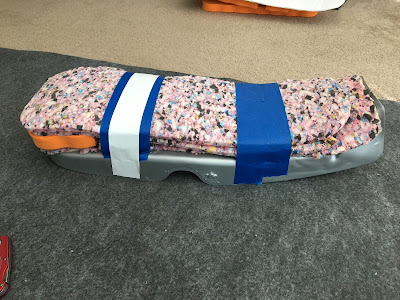
I did tape down the foam this time, just to really make sure to preserve the shape and so nothing would shift.
Having to redo the cover several times over also helped nail down the technique. I would pull the fabric down tight over the prong, mark it with the red sharpie, then use the X-acto to create the smallest hole possible.
Slightly nerve-wracking doing it on the white leather, but it all came out swimmingly on the first try.
Actually mounted on the bike, the seat looks almost perfect. And the gamble with the two-tone black/white paid off nicely, I think.
Labels:
Run Red Run,
seat
Sunday, April 15, 2018
Run Red Run: Two-Tone Seat Day 2
Was eager to try out the seat but as soon as I saw it, I was disappointed by the overall height. It just looked too big for the frame. The color was fine but it was hard to judge while trying to ignore the thickness.
So I removed all the think orange foam and just kept the original foam layers. But I added in a bit of the orange padding at the back to fill out the rear, which seemed to have more material.
Then I covered it with the old chocolate cover to test.
So I removed all the think orange foam and just kept the original foam layers. But I added in a bit of the orange padding at the back to fill out the rear, which seemed to have more material.
Then I covered it with the old chocolate cover to test.
Labels:
Run Red Run,
seat
Saturday, April 14, 2018
Run Red Run: Two-Tone Seat Day 1
Got the new two-tone black on white seat cover from the same "joemama" seller on eBay where I'd gotten both Ivy's light brown seat and the darker brown "chocolate" one.
I did forget to ask for no Honda logo, but the light silver one they put actually doesn't look so bad.
I wanted to get it on the seat so I could check the color, but I didn't want to put any holes in it that I'd regret. So I put in enough padding so that I would only have to punch holes in the bottom "skirt".
I used some orange foam kneeling pads to add the required bulk.
Labels:
Run Red Run,
seat
Friday, April 13, 2018
Run Red Run: Steering Practice
Wanted to practice getting the steering head off in advance of the big paint job. Would have been a lot easier if, ONCE AGAIN, I had checked the excellent notes I had made for myself before just diving in and re-inventing the wheel.
Everything actually came apart pretty easily. Though I did forget that as soon as you remove the steering bolt the bottom bearings are going to start falling out. I think I did lose a few before adding the little rectangular magnets to keep them from rolling away.
But ended up replacing them with the caged plastic bearing and now I really don't see any reason why you wouldn't use the caged ones all the time.
The problem came during re-assembly when the forks came up way too short to reach the bridge. Ended up taking the whole thing apart again to see what I'd done wrong. If only I'd read the old notes, I would have realized that it's easiest to screw in a long 10mm bolt and use it to yank the fork all the way up to the bridge so you can secure it.
Other than that, the only other thing to work out is how to lock the center stand in place so that the whole thing isn't so precariously balanced.
Also added in the recently white painted cushions for a color test.
Labels:
painting,
Run Red Run,
steering
Subscribe to:
Comments (Atom)


